How to customize a WordPress theme to suit your needs?
So you want to create a website on WordPress? In the beginning, consider the purpose of the site, and what stands behind it – what functions it should have and how it should look like. When it comes to the latter, there are many options available, because WordPress itself offers thousands of themes – some are paid, some free, many dedicated to specific industries or with built-in functionalities, for example in the form of a plug-in.
But what if the theme offered by WordPress or template designers doesn’t fit your vision of the site perfectly? Well, the good news is that each theme can be customized. Below you will find some methods that will show you the how best to create custom CSS in WordPress.
How to customize a WP theme to suit your needs?
If you have activated a selected theme on your site and you want to add custom CSS to your WordPress, you have several options to choose from:
- Basic changes from the Dashboard
- Adding and overwriting styles (advanced methods):
- make changes in the theme code from the dashboard
- change the code by using a plugin
- additional CSS – advanced changes from the dashboard
- create a child theme
Basic changes from the dashboard
In the dashboard, you usually have different options to customize the theme to fit your needs. The changes that are possible to implement and their limitations and possibilities largely depend on the creators of the selected theme, and what editing options they have made available for the user.
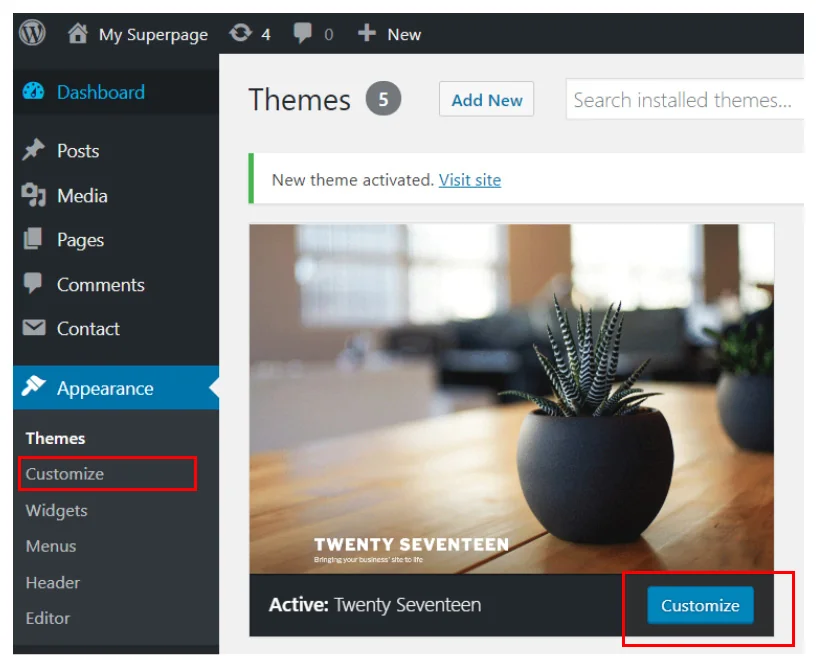
For example, the TWENTY SEVENTEEN theme, allows you to customize the template by clicking the CUSTOMIZE button. You can change the theme using the myriad of options available for this particular theme. The basic changes you can make are, for example, changing the background image of the homepage, altering the colors of the headers or changing the font sizes.
Source: author’s own
Basic changes made using the CUSTOMIZE function.
However, if you find that the changes you want to make are not allowed you can attempt to change the code yourself. But how to do it correctly, without breaking your website?
Adding and overwriting styles
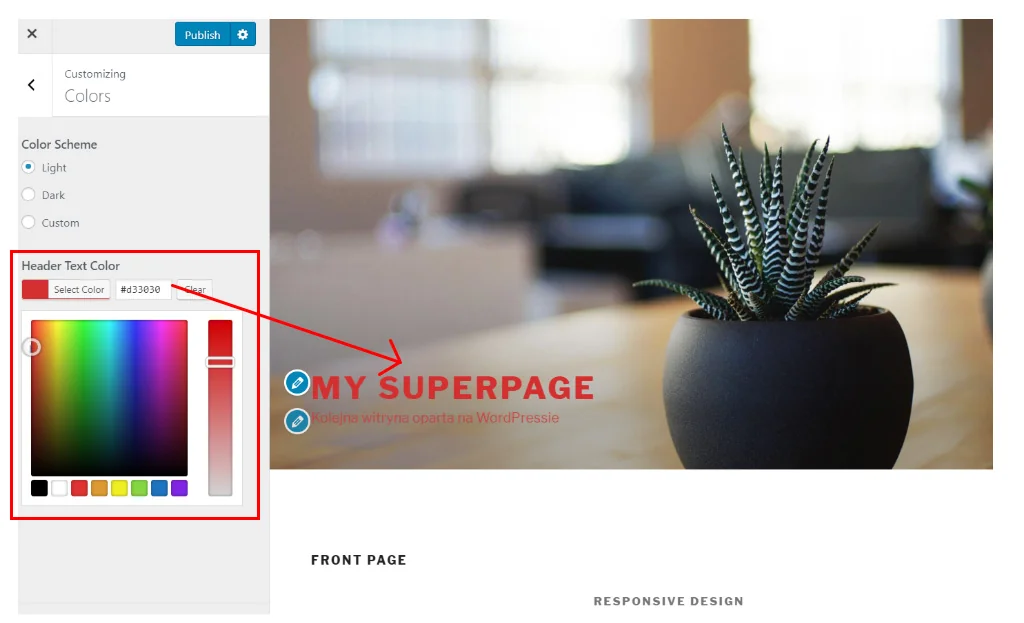
It may happen that the basic options to customize the TWENTY SEVENTEEN theme will not satisfy your needs. Maybe you want the text header MY SUPERPAGE to be red, and the subheader Another WordPress-based site to be green. However, options from the dashboard are limited and only allow you to choose one color for both lines of text. To assign both the header and subheader different colors, you will need knowledge of CSS and HTML.
There are 4 advanced methods of changing the theme code. They are described below.
Source: author’s own
Using the basic customization within the dashboard will give you limited options to change the look of your website.
Changing the theme code from the dashboard (not recommended)
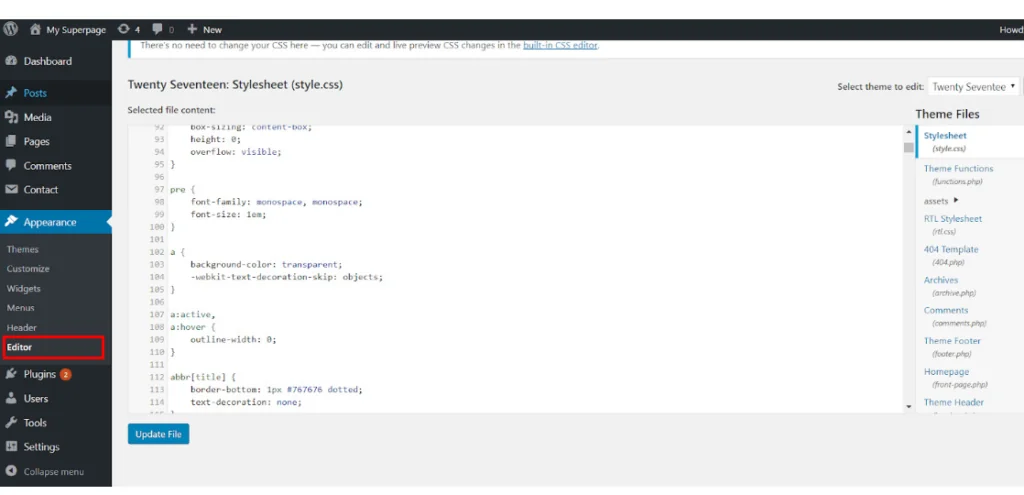
One of the methods to alter the code of the theme you are using is to make advanced changes from the dashboard. To do this, go to APPEARANCE → EDITOR. However, it’s crucial to keep in mind that when you update a theme, the changes you have made in this manner can be deleted or overwritten. This is why this method is not recommended when customizing your theme. An alternative way, one that is much safer is to use specially designed plugins.
Source: author’s own
Altering the code from the dashboard.
Make changes using a plugin
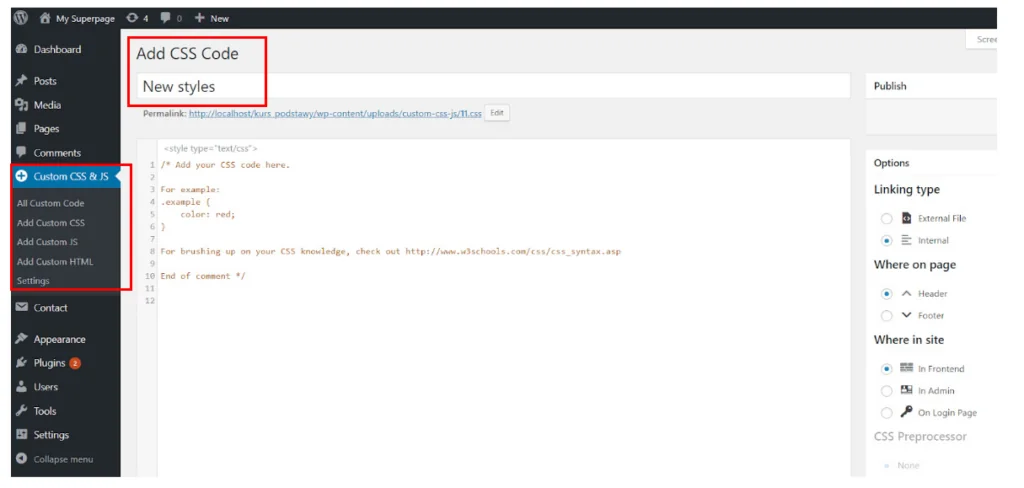
An example of a plugin that will allow you to change the theme to suit your needs is Simple Custom CSS and JS. This plugin is independent of the theme you’re using, so the code you will add to it will work on every active theme. Additionally, Simple Custom CSS and JS includes an editor with syntax highlighting, which makes writing code easier.
Source: author’s own
Simple Custom CSS and JS plugin (accessible via the side menu in the dashboard.
Additional CSS – advanced changes from the dashboard
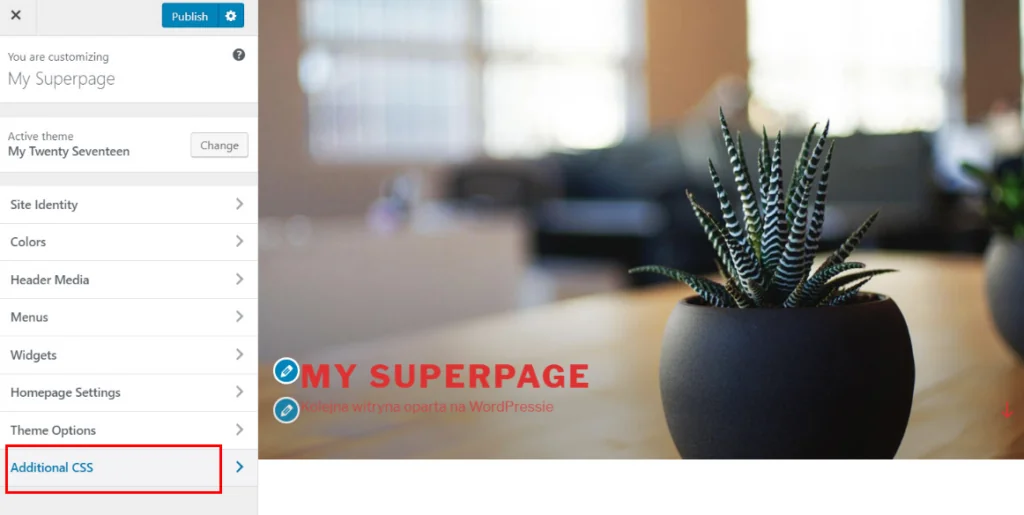
Version 4.7 and higher of WordPress give you the option of entering your own CSS code through the dashboard. This option can be found by clicking through APPEARANCE → CUSTOMISE → ADDITIONAL CSS. This method saves you having to create a child theme (about which you can read below), and the changes will not be lost when updating the original theme. This is the most convenient option for small CSS changes.
Source: author’s own
Advanced changes made from the dashboard.
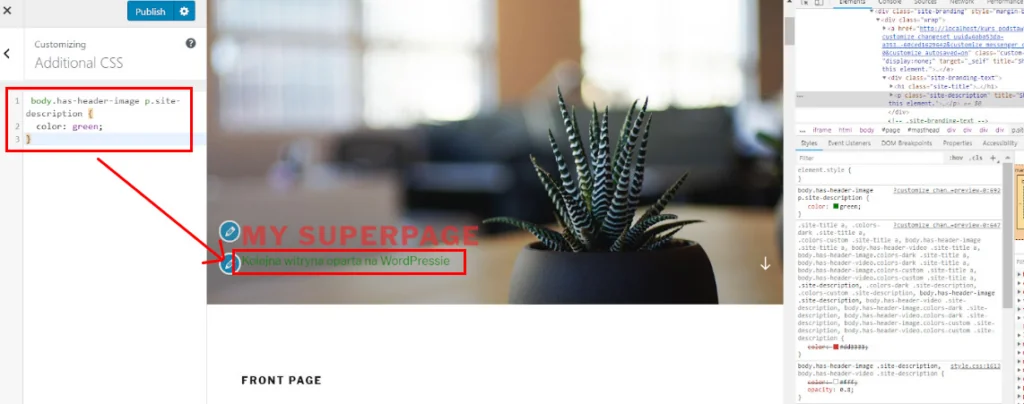
To change the selected header to green (see above), after clicking on ADDITIONAL CSS, add the following code in the space reserved for your styles:
Source: author’s own
Changing the colour of the header with the help of the ADDITIONAL CSS function in the dashboard.
Creating a child theme
If you want to alter the theme code by applying more advanced changes to it, you should do it within the child theme. This method is recommended because theme developers regularly make updates to them and during such updates, all old files are transformed into new ones. This means that if you altered the original theme files, the changes you made could be overwritten or deleted.

How to create a child theme?
A child theme can be created in two ways:
- By using plugins which have been created for this purpose such as Child Themify
Install the Child Themify plugin and go to APPEARANCE → CREATE CHILD THEME in the dashboard. If you have several themes installed, choose the one you’re creating a child theme for.
- No plugins
Go to the site directory (located on the server or locally in xampp/htdocs), and then in yourdirectory/wp-content/themes. Create a new folder – in this case, twentyseventeen-child – in which you will add files with custom functions or styles.

Source: author’s own
The file structure in the sample child theme.
How do you add new styles in the child theme?
style.css
In the twentyseventeen-child folder, create a new style.css file. You have to include in it the appropriate information in the form of a comment, or theme declaration. Because of this, WordPress can identify the creation of a child theme. You do this by placing the appropriate lines of code in the newly created style.css file. Below is an example declaration of a child theme:
/*
Theme Name: My Twenty Seventeen
Description: Twenty Eleven Child Theme
Author: Name and surname
Template: twentyseventeen
*/
The lines of code required for the theme to load properly are:
- Theme Name [enter any name of the child theme here]
- Template [enter the name of the parent theme directory to which the child theme is to be assigned]
Remember that the newly created CSS file will overwrite the parent theme styles, so now CSS styles will not work on your site at all. To import styles from the original theme, in the style.css file of the child theme, include this line of code under the theme declaration:
@import url(‘../twentytwelve/style.css’);
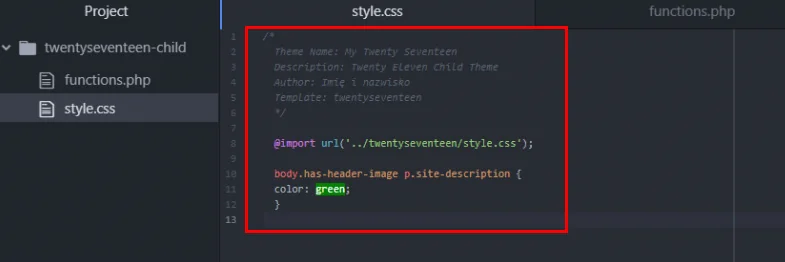
Now, under this line of code, you can now add your custom CSS. 🙂 To change our sample text Another WordPress-based site to green, just add:
Source: author’s own
Sample style.css style with the child theme declaration, parent CSS styles and customized CSS import.
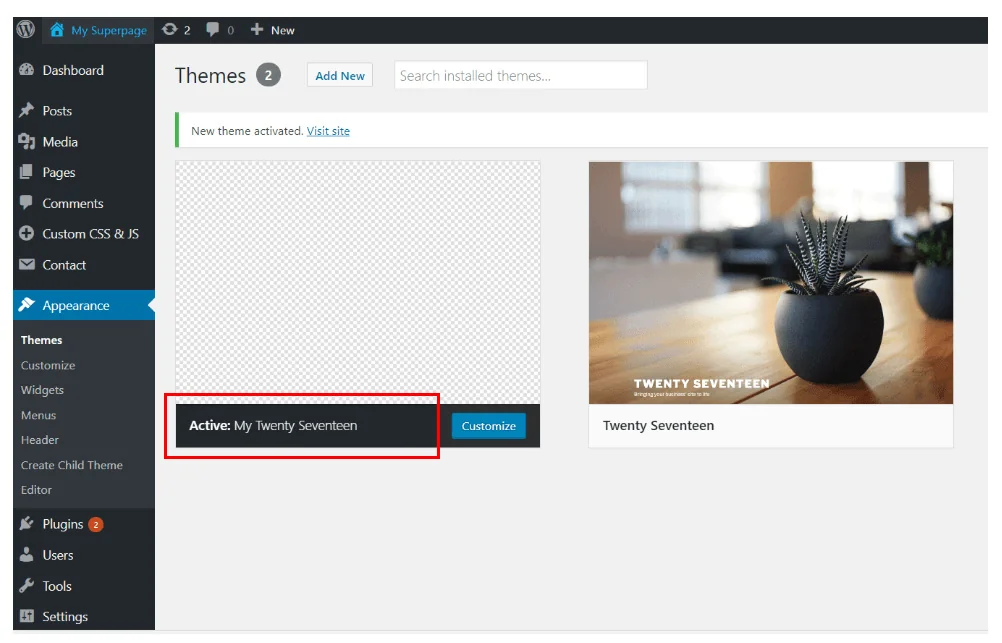
To start using the child theme, go to APPEARANCE → THEMES in the dashboard and install the child theme you created.
Source: author’s own
Activating the child theme.
Important about the child theme
Before creating a child theme, it is worth to read the following documentation https://codex.wordpress.org/Theme_Development and https://codex.wordpress.org/Child_Themes. You’ll find the best practices for creating themes and child themes. The most important information contained in the above documentation is:
- There can not be two themes with the same information in the headers, because it will cause problems on the theme selection page. If you’re creating a theme based on an existing one, make sure you’ve changed this data.
- You can name the child theme directory as you like, but it is good practice to give it the name of the parent theme with the -child ending, in our case: twentyseventeen-child.
What if you don’t know CSS?
If you don’t know the basics of CSS, don’t know anyone who can help and yet you want to modify the styles on your site, you can use tools such as:
- Plugins such as SiteOrigin CSS
They allow you to conveniently edit CSS on the page using an editor. By making changes, you will have access to the live view, which makes workflow easier.
- CSS generators such as http://css3generator.com/ or http://enjoycss.com/59x/1#transform
Using them, you can freely experiment with different styles and ultimately, generate the CSS code and paste it into a file with styles in your child theme (or using another method described above).
To sum up
If you haven’t already installed a theme on your site, you should think about it carefully. In your search, keep in mind that you won’t be able to adapt every theme to your suit needs later. Instead, look for a theme that not only looks good but is also optimized, supported and developed by the creators, sports full documentation and features you need on the site. Choosing a theme that meets the above requirements will save you a lot of time later on in making adjustments.
This will allow you to avoid any technical problems related to making the wrong decision. It may happen that in spite of a well thought-out theme choice, you may need to make some adjustments to how it looks by yourself. In this case, start with basic operations using the CUSTOMIZE button. If this is not enough, I recommend the ADDITIONAL CSS option or the use of plugins. More advanced users can try to play with the child theme, ie direct actions on the page files. They allow you to conveniently edit CSS on the page using a convenient editor. By making changes, you will have access to the live view, which will make your work easier.


